Here’s how to paint a deck to protect it from rain, snow, and sun damage.
Building a deck in the yard is a great way to dedicate an area of your home to party hosting or outdoor dining. It gives you a place to set up a grill, some chairs, a table, and possibly even a gazebo to protect you and your guests from rain or provide shade on a hot day. To continue enjoying your wood deck, you need to know how to paint a deck or stain it to prevent moisture from seeping into the wood and causing the deck to rot.
Stain is a great option for sealing the deck against moisture, but it isn’t as effective as paint against harmful UV radiation, which can damage the wood fibers and make the deck more prone to cracking and warping. Also, keep in mind that a deck can and should be refinished when you start to see signs of wear and tear, like chipped or peeling paint. Follow these steps to learn how to paint a deck the right way.
When to Paint a Deck
One of the drawbacks of painting a deck is that you need to factor in the weather. If it rains in the middle of your painting project, you may have to deal with running paint, streaks, slow drying times, partial coverage, and an uneven finish once the paint does dry. To avoid these issues, check the weather and plan to complete the job on a nice, sunny day with at least 24 hours without rain, giving the paint and primer enough time to dry.
Also, it’s essential to pay attention to the temperature and humidity. The best temperature for painting a deck ranges from about 50 to 90°F. Paint dries slowly in high humidity, too, so try to complete outdoor painting projects when the humidity is low to help speed up the drying time.
The Best Time of Day to Paint a Deck
It may feel great to get to work when the sun is high overhead, but the best time to paint is when the deck is in the shade because this prevents the paint from drying too quickly. If the paint dries too fast, it can appear uneven and patchy, so for the best finish, get started early in the morning while the temperature is lower, then allow the entire deck to dry in the afternoon during the hottest hours of the day.
Working Safely
When working on an indoor painting project, ventilation is your most important safety concern, but outdoors, you have the benefit of open air, so you won’t need to worry about setting up fans to clear paint fumes. You should still wear closed-toe shoes, long pants, a long-sleeve shirt, work gloves, safety glasses, and a mask. The mask isn’t necessary for painting outdoors if you’re working with a paintbrush and paint roller, but a mask is essential if you use a paint sprayer. (It can also help prevent inhaling sawdust and paint chips while preparing the deck.)
What You’ll Need
Equipment / Tools
- Broom
- Paint scraper
- Power sander (optional)
- Hammer
- Wire scrub brush
- Drop cloth
- Pressure washer
- Paint roller
- Paintbrush
Materials
- Sandpaper or sanding block
- Nails
- Exterior wood putty
- Warm soapy water
- Mold deterrent
- Painters tape
- Exterior primer
- Exterior paint
Instructions
How to Paint a Deck
Learning how to paint a deck isn’t difficult, but it does take time, so be prepared to spend several hours sanding, scraping, patching, cleaning, and painting. After painting, allow 24 to 48 hours before using the deck.
Choosing the right color for your deck will save you time and money. Test a few shades once the deck has been sanded to get an accurate idea of the different paints. Use your home’s exterior colors to inform the paint you choose for your deck to keep them visually connected. Complement the surrounding trees, plants, and flowers as well.
Scrape Off Old Paint
Old chipped and peeling paint will prevent the new paint from bonding with the deck, so preparing the deck before you can start painting is necessary. You don’t need to worry about this step if you’re working on a new deck.
Clear any objects off the deck and sweep to remove dust, dirt, and debris. After sweeping, use a paint scraper to remove the paint on the deck. Run the scraper over areas with flaking, chipped, or peeling paint. Apply pressure to the scraper so that it slides under and across the existing paint without damaging the wood underneath.
-
Sand Rough Edges for a Smooth Finish
The next step in this process is to sand the deck. If the deck is in relatively good shape, you can use sandpaper or a sanding block to manually smooth rough edges. However, if you’re working on an older deck known for splinters, renting a power sander from your local home improvement store may be better for sanding the entire deck surface. Not only will this remove the rough edges, but it can also help to get rid of old paint or stain so that the new paint bonds to the deck.
-
Repair Loose or Damaged Boards
Inspect the deck for any signs of loose boards, protruding nails, chips, divots, or cracks. Use a hammer and nails to fix loose deck boards and level out any nails that are sticking up. Exterior wood putty can be used to fill chips, divots, and small cracks, though if any of the boards are badly damaged, you should replace the entire board to prevent future issues.
Wash the Deck
Whether painting a new deck or revitalizing an old one, washing any dust, dirt, and debris off the deck before painting is essential. Use a broom to sweep away the paint chips and sawdust you created while scraping, sanding, and patching the deck. Next, decide if you want to wash the deck with a wire scrub brush and warm, soapy water or if you have enough experience to clean the desk with a pressure washer.
Remember that a pressure washer sprays water at a high enough pressure to damage the wood if it isn’t handled correctly. If you haven’t used a pressure washer before, it’s best to stick with a bucket of warm water and a wire scrub brush. After washing the deck, treat the wood with a mold deterrent spray, then allow the deck to dry before proceeding to the next step.
-
Prepare to Paint
Painters tape and drop cloths can be used to protect areas of the deck and yard that you don’t want to paint, such as walls, doors, windows, metal railings, flowers, or shrubs. Apply painters tape around the borders of the deck to avoid accidentally painting adjacent surfaces, and use one or more drop cloths to cover vegetation, yard ornaments, and any other objects you want to protect.
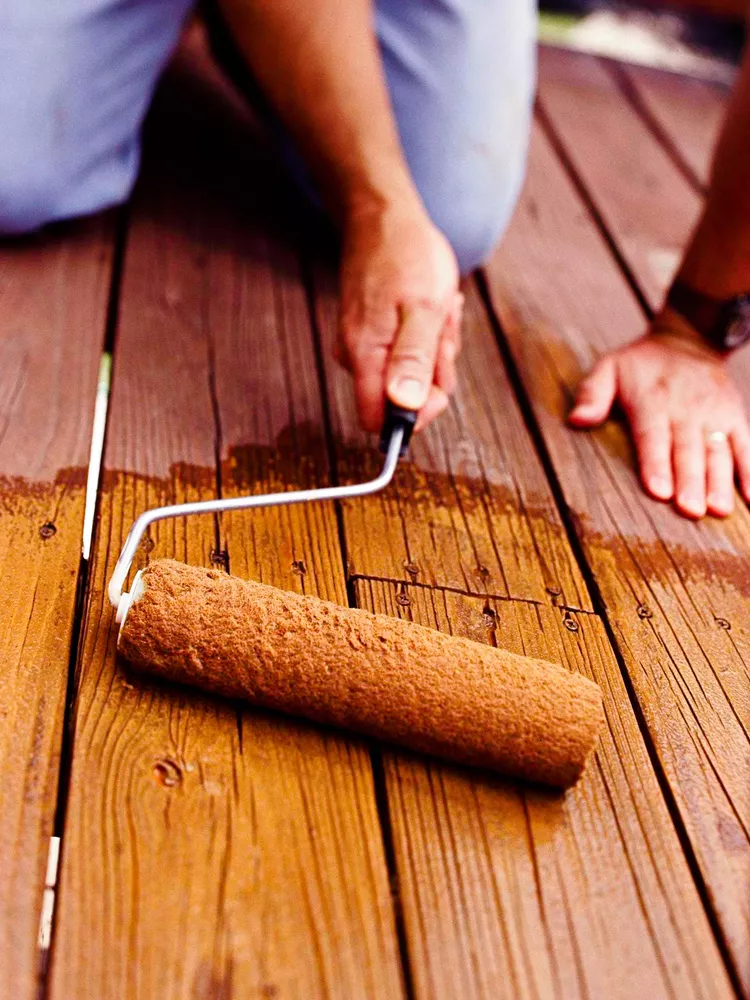
Apply Paint
For best results, you’ll usually want to apply a coat of primer before painting. Use a paintbrush and paint roller to apply the primer, then allow it to dry for about 1 to 4 hours. Always check the manufacturer’s recommendations for drying time to ensure you give the primer enough time to dry before painting.
Once the primer is dry, you can start to paint. Paintbrushes are great for narrow spaces between balustrades, and in the corners, but for the rest of the deck, use a paint roller. Consider investing in an extension pole for your paint roller to paint the deck quickly and effectively without squatting or kneeling for an extended period. After the first coat, let the paint dry for 1 to 2 hours, then add a second coat if necessary.
Whether you need one, two, or three coats of paint typically depends on the color of the paint and the coverage. If the old paint or the exterior wood putty is showing through, you’ll need another coat of paint for complete coverage. Allow the paint to dry for 24 to 48 hours before resuming regular deck use.